
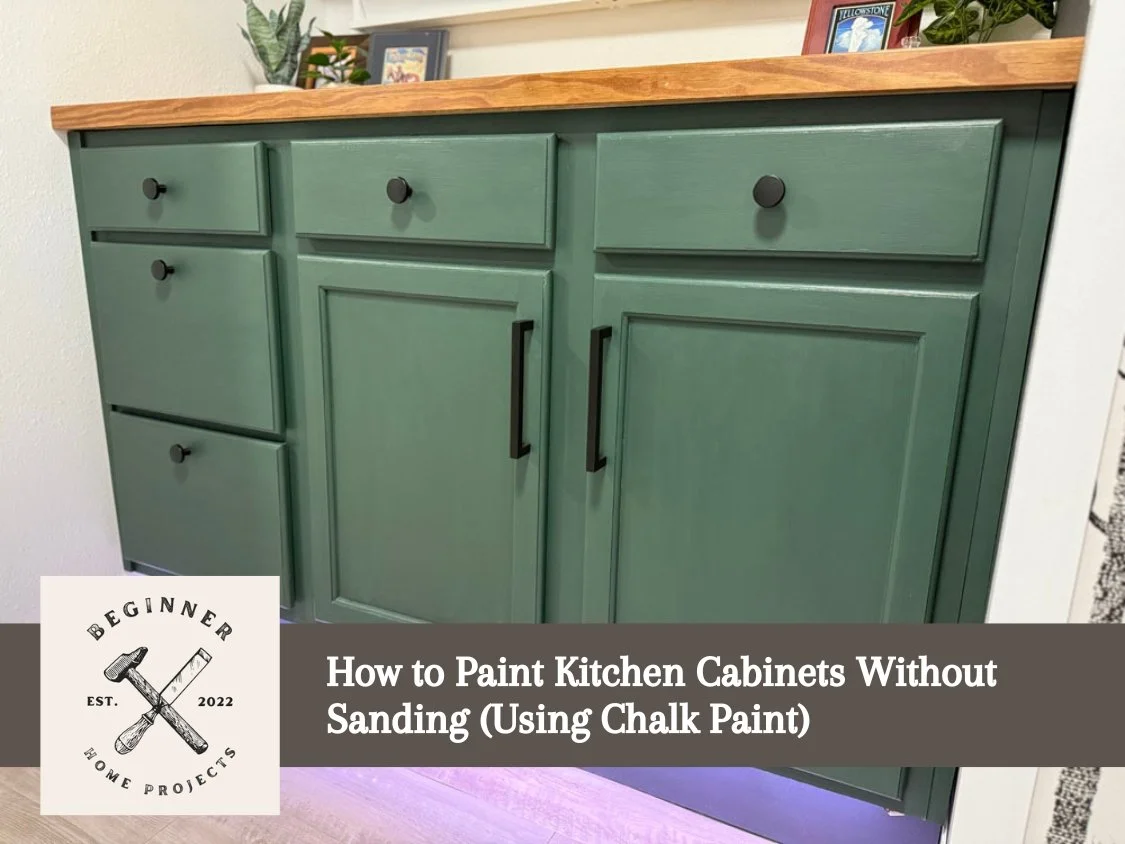
How to Paint Kitchen Cabinets Without Sanding (Using Chalk Paint)
By Sean, DIY enthusiast & master of sarcasm. Last updated March 17, 2026.
This post contains affiliate links. As an Amazon Associate, I earn from qualifying purchases at no additional cost to you. Thank you!
TL;DR: Painting kitchen cabinets without sanding is completely achievable, and chalk paint makes it easier than you'd think. Skip the sandpaper, skip the primer, and focus on two things: a thorough degreasing and a quality sealer. With two coats of chalk paint and a polycrylic topcoat, you can transform your kitchen cabinets in a weekend. This guide walks you through every step, based on real experience doing this multiple times.
Let me be honest with you…
The first time I decided to paint my kitchen cabinets, I almost talked myself out of it before I even started. The tutorials I found all said the same thing: sand everything down, apply primer, sand again, then paint. I'd done enough sanding in my shop to know exactly what that meant. Dust everywhere, aching arms, and a weekend completely gone before a drop of paint ever hit the cabinets. I put the project off for months.
Then I discovered chalk paint, and it genuinely changed how I approach cabinet makeovers. No sanding. No priming. Just clean, paint, seal, and done. I've now used this method multiple times on my own cabinets, and the results have held up better than I expected. If you've been staring at your dated kitchen cabinets and dreading the prep work, this guide is for you! It's beginner-friendly, budget-conscious, and based on what actually works, not just what sounds good on paper.
Table of Contents
Can You Really Paint Kitchen Cabinets Without Sanding?
Why Chalk Paint is the Best Paint for Kitchen Cabinets Without Sanding
What You'll Need
How to Paint Kitchen Cabinets Without Sanding: Step by Step
How Long Does Chalk Paint Last on Kitchen Cabinets?
Chalk Paint Kitchen Cabinets: Before and After
Frequently Asked Questions
Can You Really Paint Kitchen Cabinets Without Sanding?
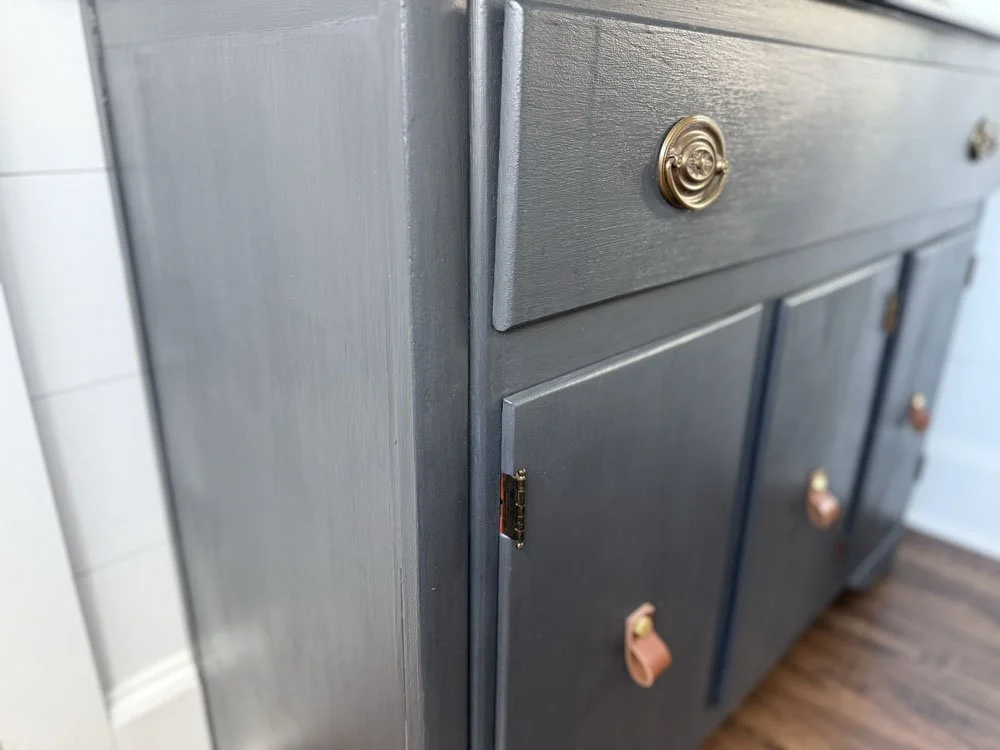
I used chalk paint on this old dresser and turned it into a vanity for my bathroom. The chalk paint has held up great after years and years of use.
Yes, you really can paint kitchen cabinets without using your sander, and the secret is using the right paint. Chalk paint is formulated with a porous, mineral-based composition that grips most surfaces without the roughened texture sanding creates. Traditional latex and oil-based paints rely on mechanical adhesion, meaning they need a rough surface to adhere to. Chalk paint doesn't. Its formula bonds directly to wood, MDF, and even laminate cabinets, making it one of the few paints that genuinely delivers on the no-sand promise.
That said, skipping sanding doesn't mean skipping prep entirely. The single most important step in this process, and the one that determines whether your paint job lasts two years or ten, is cleaning and degreasing. We'll get to that shortly.
Why Chalk Paint is the Best Paint for Kitchen Cabinets Without Sanding
Not all no-sand paints are created equal, but chalk paint consistently rises to the top for cabinet makeovers, and for good reason.
Compared to standard latex cabinet paint, chalk paint requires no primer, dries faster (typically 30 to 60 minutes between coats), and produces a beautiful matte finish that hides brush strokes better than glossier alternatives. Compared to oil-based paints, it's far easier to clean up, has lower VOCs, and doesn't yellow over time.
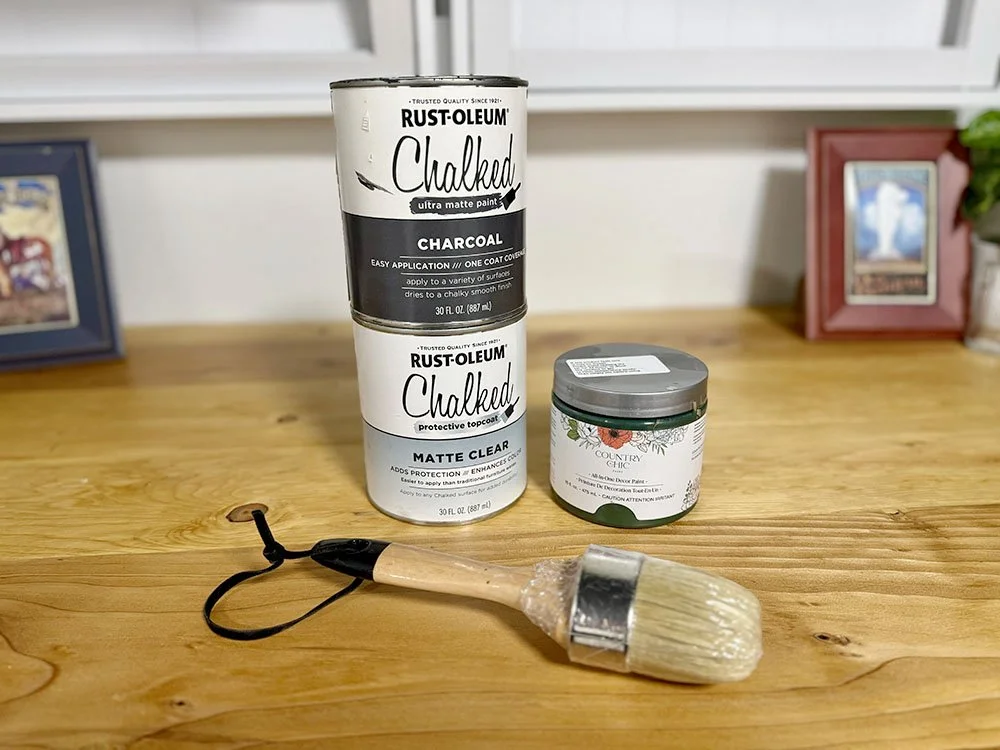
Popular options include Annie Sloan Chalk Paint, Rust-Oleum Chalked (which is my usual go-to), and Waverly Inspirations Chalk Paint, all of which are widely available and perfect for a weekend beginner-friendly project like this. Each brand has its own consistency and coverage, so results can vary slightly, but all three are solid choices for cabinets.
The one trade-off worth knowing upfront: chalk paint is porous by nature, which means it absorbs moisture and grease easily if left unsealed. On kitchen cabinets, which take daily abuse near water, steam, and cooking oils, sealing is non-negotiable. Skip the sealer, and your paint job won't last. I’ll cover the best sealer options in the step-by-step section below.
What You'll Need
One of the underrated advantages of the chalk paint method is how short the supply list is. No sandpaper. No primer. No sanding block or shop vac to clean up the dust afterward. Here's everything you need:
Chalk paint in your chosen color
A quality natural-bristle brush or small foam roller
Degreaser or TSP substitute
Clean rags or microfiber cloths
Screwdriver (for removing hardware)
Clear furniture wax or polycrylic sealer
That's it. If you've painted anything before, there's a good chance you already have half of these items on hand.
How to Paint Kitchen Cabinets Without Sanding: Step by Step
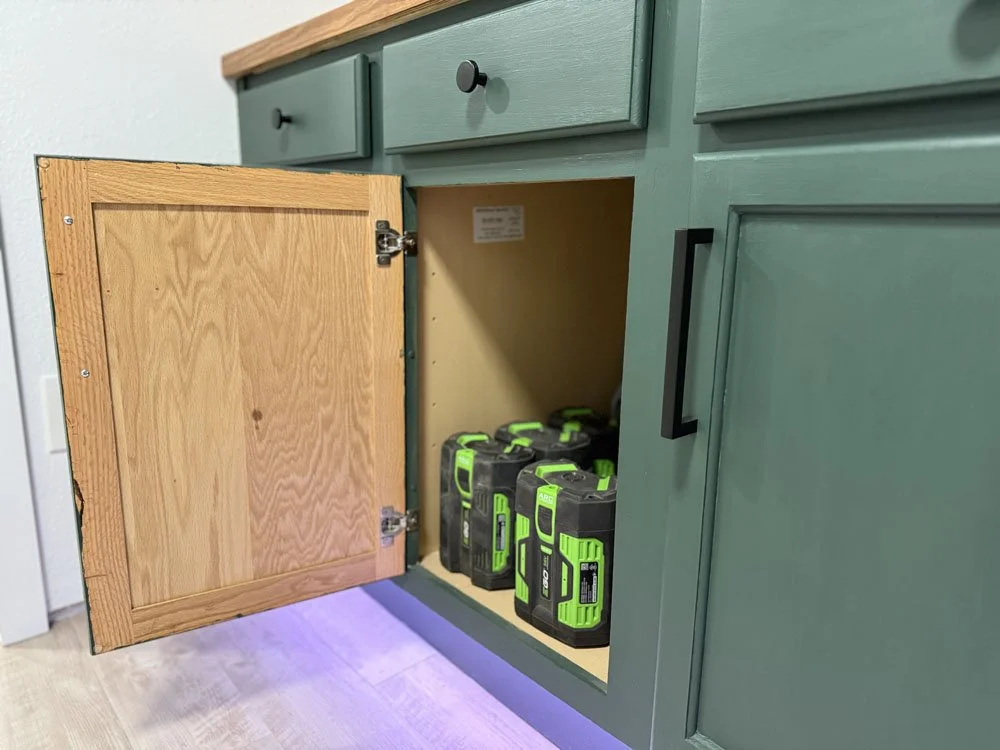
These are very old (and basic!) big-box-store cabinets with an orange oak finish. Chalk paint was an ideal option to give them new life.
Step 1: Remove Cabinet Doors and Hardware
Start by removing all cabinet doors and drawer fronts using a screwdriver. Painting doors flat rather than vertical and attached gives you far more control and produces a cleaner, more even finish. It also lets you paint the cabinet boxes themselves without awkward angles or drips running down the face frames.
Before you pull anything off, label each door using a small piece of painter's tape marked with a number or letter. Trust me on this one: once cabinet doors are off the hinges, they start to look identical, and reinstalling them in the wrong spots is a frustrating, completely avoidable mistake. Store your hardware (hinges, handles, screws) in a labeled zip-lock bag for each door.
Step 2: Clean and Degrease Thoroughly
This is the most important step in the entire process, and the one most beginners underestimate. When you skip sanding, your paint's ability to adhere depends entirely on how clean the surface is. Kitchen cabinets are coated in an invisible layer of cooking grease, airborne oils, and grime that builds up over years of use. Paint applied over that layer will peel, chip, and fail prematurely, no matter how good your chalk paint is.
Use a TSP substitute or a dedicated kitchen degreaser and scrub every surface you plan to paint, including the cabinet boxes, not just the doors. Wipe everything down with a clean microfiber cloth and let the surfaces dry completely before you open a single can of paint.
I'll be direct here: every time I've rushed or skimped on this step, I've regretted it. Every time I've done it properly, the paint has adhered beautifully and held up for years. Don't skip it!
Step 3: Apply Your First Coat of Chalk Paint
Once your cabinets are clean and dry, you're ready to paint. For a slightly textured, hand-painted look, use a natural-bristle brush. For a smoother finish that more closely mimics factory-painted cabinets, use a small foam roller on the flat panels and a brush for the edges and details.
Apply thin, even coats, working in the direction of the wood grain where possible. Don't overload your brush, either. Too much paint at once leads to drips and uneven coverage that's harder to fix than it sounds. Your first coat will likely look streaky and uneven, and that's completely normal. Chalk paint is a two-coat paint, and the first coat is just the foundation.
Allow the first coat to dry for 30 to 60 minutes before moving on. One of chalk paint's biggest advantages is its fast dry time, which makes it easy to complete both coats in a single day.
Step 4: Apply a Second Coat
Once your first coat is fully dry, apply a second coat using the same technique. This is where the color evens out, coverage becomes consistent, and your cabinets start to look like the finished product. Check carefully for drips or thick spots and smooth them out with your brush while the paint is still wet.
In my experience, two coats is almost always sufficient with quality chalk paint. Going thicker than necessary actually works against you: it can affect the topcoat's adhesion and make the finish feel less durable over time. Thin and even, applied twice, is always the better approach.
Step 5: Seal the Paint
Sealing is what separates a chalk-painted cabinet that lasts a season from one that lasts a decade. Once your final coat of chalk paint is fully dry (give it at least a few hours, ideally overnight), it's time to apply your topcoat.
You have two main options. Clear furniture wax gives a softer, more natural finish and is easier to apply, but it requires occasional reapplication and offers less protection against moisture and daily wear. Polycrylic, which is a water-based protective finish, creates a harder, more durable surface that stands up far better to the demands of a kitchen environment. For cabinets near the sink or stove, polycrylic is the stronger choice, and it's what I reach for every time.
Apply two coats of your chosen sealer, allowing each coat to dry fully between applications. Your cabinets will feel noticeably harder and more durable once the sealer has fully cured, which typically takes 24 to 72 hours, depending on the product and conditions.
How Long Does Chalk Paint Last on Kitchen Cabinets?
With proper preparation and sealing, chalk paint can last anywhere from five to ten years on kitchen cabinets. The variables that most affect longevity are sealer type, the number of sealer coats applied, and the location of the cabinets in the kitchen. Cabinets near the stove and sink take the most abuse and may show wear sooner than cabinets on the opposite side of the kitchen. Applying two coats of polycrylic rather than one makes a measurable difference in long-term durability.
Chalk Paint Kitchen Cabinets: Before and After


Chalk paint produces a matte, velvety finish that has a slightly different character than factory-sprayed or professionally lacquered cabinets. It's warmer, softer, and has a handcrafted quality that many homeowners find more appealing than a perfectly glossy surface. That said, it's worth setting realistic expectations before you start.
Minor brush strokes and subtle texture are normal and part of the aesthetic; they're not flaws. If you prefer a smoother result, a foam roller on the flat panels gets you much closer to that look. The color transformation, however, is typically dramatic. Going from stained oak or dated off-white to a clean, modern hue like soft white, navy, or sage green can make an older kitchen feel completely renovated without touching a single cabinet box or replacing a single door. Nice!
FAQs
-
Yes. Chalk paint is specifically formulated to adhere to most surfaces without sanding or priming. The key is thorough degreasing before you apply any paint. Skipping the cleaning step — even with chalk paint — will result in poor adhesion and a finish that peels prematurely.
-
Annie Sloan Chalk Paint, Rust-Oleum Chalked, and Waverly Inspirations are all reliable options for kitchen cabinets. Annie Sloan offers the widest color range and excellent coverage. Rust-Oleum Chalked is widely available at major home improvement stores and is a strong budget-friendly option. All three are beginner-friendly and work well without priming or sanding.
-
Most kitchen cabinets need two coats of chalk paint for full, even coverage. Apply thin coats and allow each to dry for 30 to 60 minutes before adding the next. A third coat is rarely necessary and can actually work against adhesion if applied too thick.
-
Yes. Sealing chalk paint on kitchen cabinets is essential. Chalk paint is porous and will absorb grease, moisture, and daily grime without a protective topcoat. For kitchen cabinets specifically, two coats of polycrylic offers the most durable and long-lasting finish.