
The Easiest DIY Ceiling Mounted Barn Door You’ll Ever Make [Updated for 2026]
By Sean, DIY enthusiast & master of sarcasm. Last updated February 20, 2026.
This post contains affiliate links. As an Amazon Associate, I earn from qualifying purchases at no additional cost to you. Thank you!
TL;DR: This DIY ceiling mounted barn door guide shows how to turn a cheap hollow-core door into a space-saving sliding door when wall-mounted hardware will not work. You will learn the materials, measurements, and step-by-step process to build, paint, mount ceiling track hardware, and install a floor guide. This project works well for small rooms, low ceilings, and farmhouse-style homes, and it can be completed with basic tools and beginner-friendly skills.
My DIY Ceiling Mounted Barn Door Journey
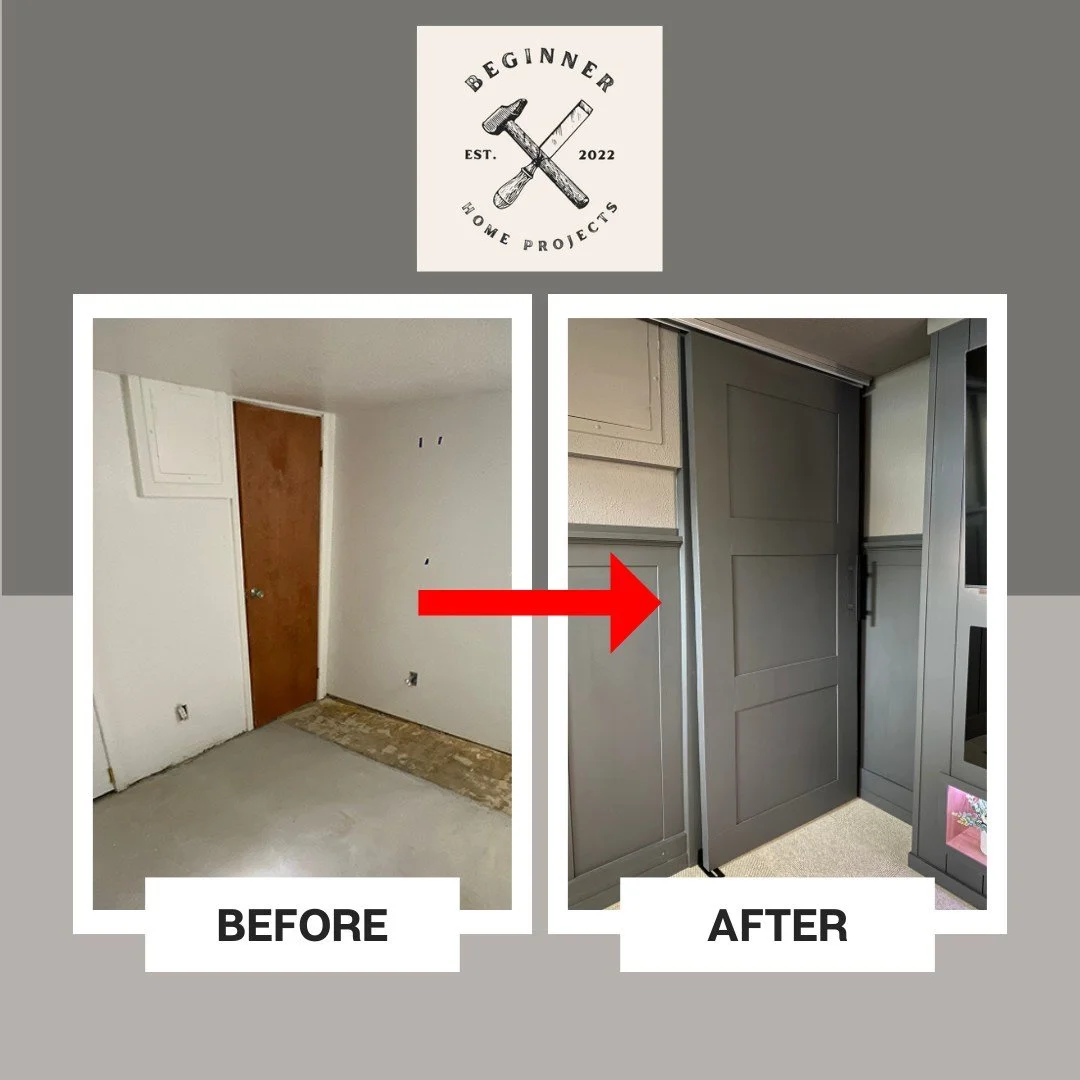
Making a DIY ceiling mounted barn door isn’t as complicated as you think. With an old hollow-core slab door, a few strips of plywood, and some tools, you can turn an ugly door into something awesome!
I know barn doors might be on the outs according to some designers, but in some cases, they are the only practical solution. I found myself in one such situation in my small den - the room is so small that having an inswing door just wasn’t practical. And because pipes on the other side of the door protrude lower than the needed door clearance, I couldn’t replace the existing inswing door with an outswing one, either.
What about a pocket door, you ask? I would have loved to do a pocket door here, but unfortunately, the only wall where I could insert a pocket door is full of electrical. PLUS, the ceilings in my den are extremely low, and there isn’t any clearance above the door openings to install traditional barn door hardware. So, a DIY ceiling mounted barn door was the only option.
Since I live in a 1917 farmhouse, a ceiling mount barn door isn’t just functional, but it also fits with the farmhouse aesthetic. I’m going for a modern farmhouse vibe in all my renovations, so if you’re in need of something similar, buckle up, and I’ll show how to build a DIY ceiling mounted barn door!
Table of Contents:
Step 1: Gather the Materials
Step 2: Measure and Cut the Rails and Stiles
Step 3: Add Rails and Stiles to the DIY Ceiling Mounted Barn Door, Then Paint
Step 4: Attach Barn Door Hardware to the Ceiling and Door
Step 5: Hang the Door, Install the Floor Guide, and Add a Door Handle
Additional DIY Ceiling Mounted Barn Door Tips
Step 1: Gather the Materials
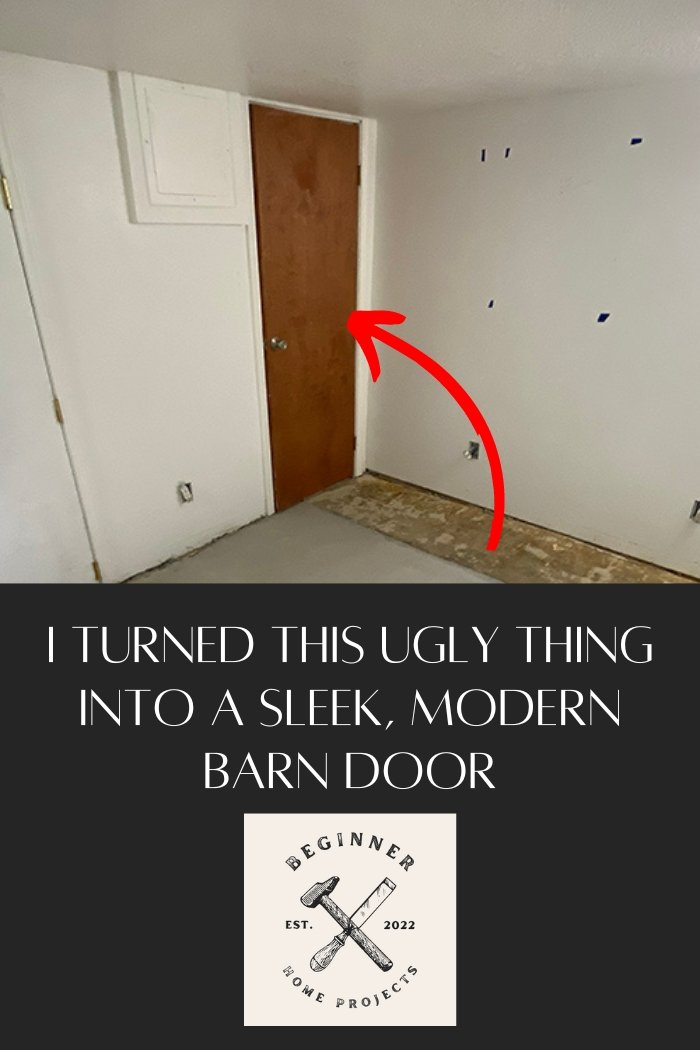
Before starting your DIY ceiling mounted barn door, you'll need to gather the necessary materials. I decided to go the easiest route, and upcycle the existing (extremely ugly) door shown above. Though I like to build things from scratch, it made no sense to do so when I had a good base with the existing door. Plus, I didn’t want to add to the mountain of trash at the local dump.
If you don’t have an existing door you can modify, you can often find cheap slab hollow-core doors like the one I used at places like Habitat for Humanity ReStore. You can also buy a plain hollow-core door at your local hardware store or big box store like Lowe’s, though that will obviously increase the expense of the project.
Additionally, you’ll need the following:
Brad nails and a nail gun
Drill and impact driver with drill bits and screwdriver bits
And, of course, you’ll need a ceiling mount bypass sliding door kit, too.
Step 2: Measure and Cut the Rails and Stiles
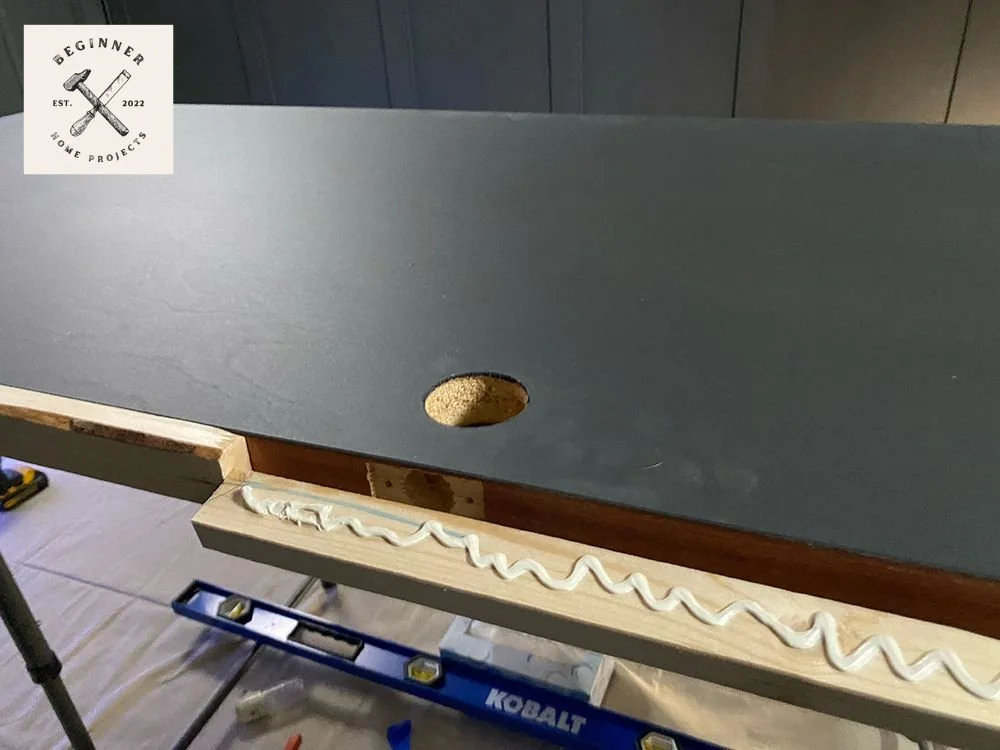
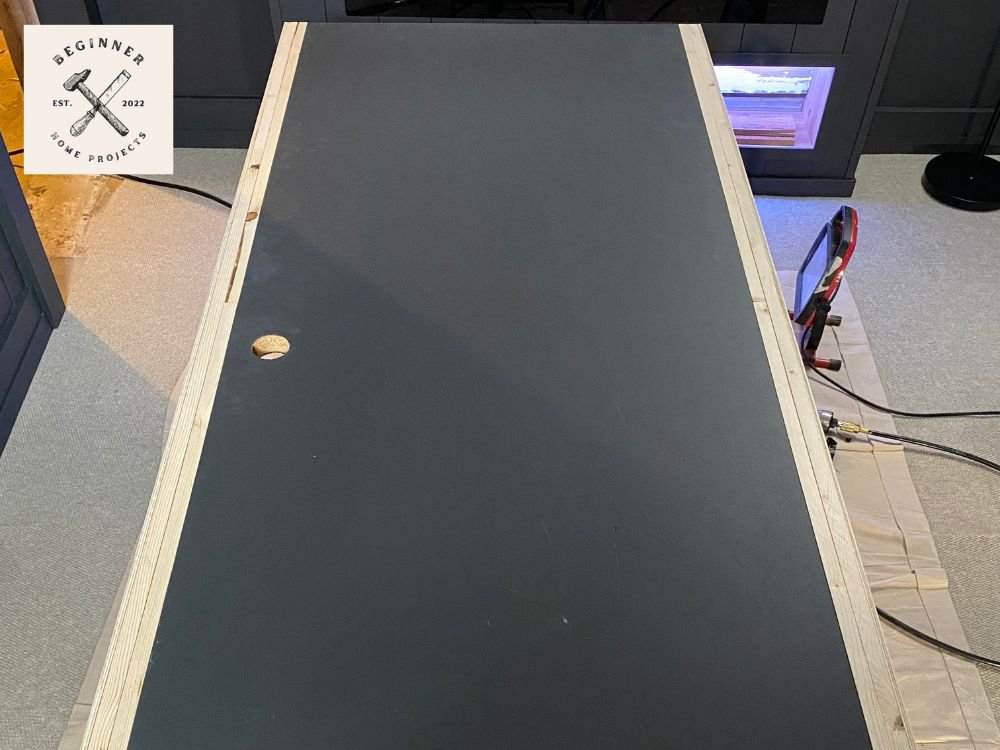
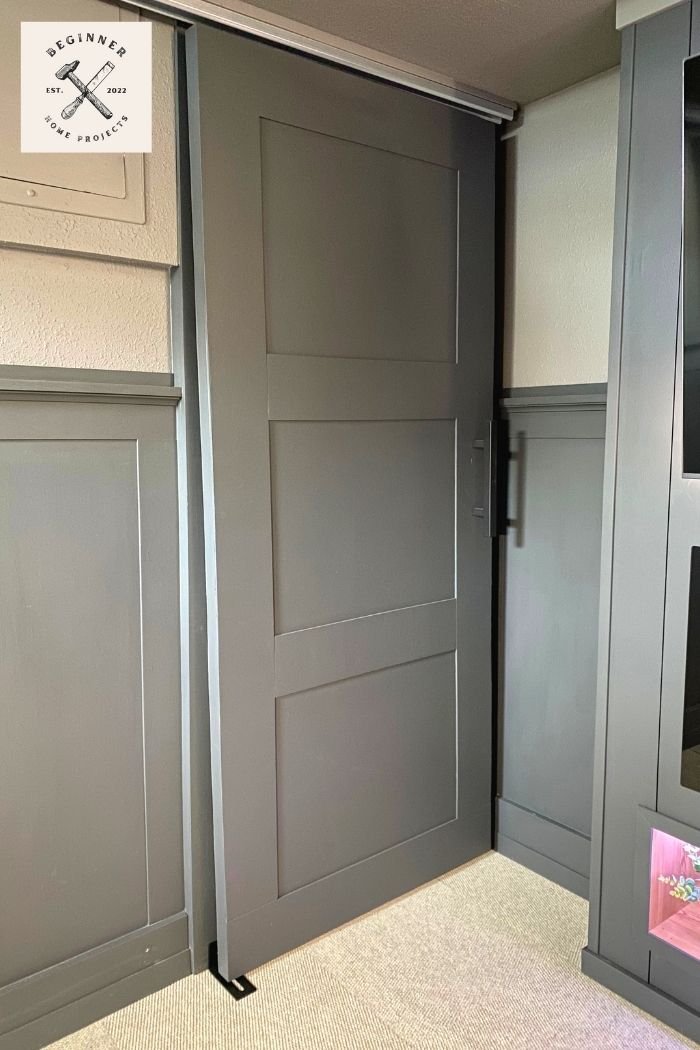
As I noted earlier, I wanted a modern-looking DIY ceiling mounted barn door, so I opted for a three-panel design using rails and stiles cut to fit the existing door. However, before I measured and cut the rails and stiles, I decided to widen the door so it extended several inches beyond the size of the doorway. I did this by simply ripping down wood from my scrap pile to the thickness of the door slab and gluing and brad nailing the pieces on either side of the door.
After widening the door, I cut plywood strips to cover the left and right edges. This covered the scrap wood I used for widening. When it was all said and done, I ended up with a door that measured 33 3/4 x 77 1/2 inches.
I was now ready to measure and cut the two rails and four stiles. I wanted the top and bottom rails to be the width of the door, so I cut each to 33 3/4 inches. I then cut the two stiles to fit between the top and bottom rails, which was 66 1/2 inches (to account for the 5 1/2-inch top rail and 5 1/2-inch bottom rail). The final cuts to make were for the middle rails, which sat in between the two stiles. These rails were 32 3/4 inches wide (to account for the width of the stiles).
After cutting all the necessary pieces, I used my DEWALT DCW210B random orbit sander and 220-grit sandpaper to clean up all the edges. I gave the surface of each rail and stile a quick sanding, too, even though the plywood was already sanded.
Note: The existing door had some divots in the surface that I filled with wood filler prior to adding the rails and stiles. This was necessary since the original door surface serves as the field between the rails and stiles. I didn’t have to worry about the hole for the doorknob because it was covered with a rail.
Step 3: Add Rails and Stiles to the DIY Ceiling Mounted Barn Door, Then Paint
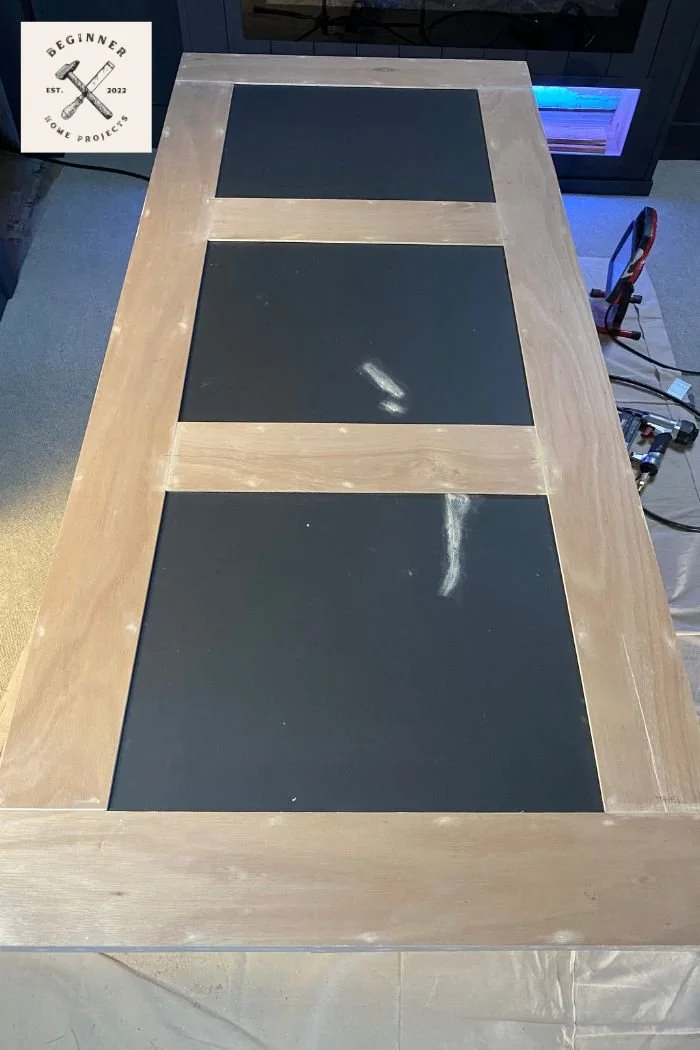
With the rails and stiles cut, it was time to put it all together. I dry-fit all the rails and stiles first before permanently affixing them. Everything fit, so I glued and brad nailed the top and bottom rails first. Next, I added the left and right stiles. Lastly, I added the two middle rails in between.
I caulked the seams between the rails and stiles but elected not to caulk the edges of the rails and stiles where they met the door because it all fit together nice and tight. I might live to regret that decision, but it’s held up so far.
Once the caulk was dry, I gave everything a couple of coats of matte black paint, allowing for a couple of hours between each coat. I let my DIY ceiling mount barn door sit overnight before attaching the hardware the next day.
Step 4: Attach Barn Door Hardware to the Ceiling and Door
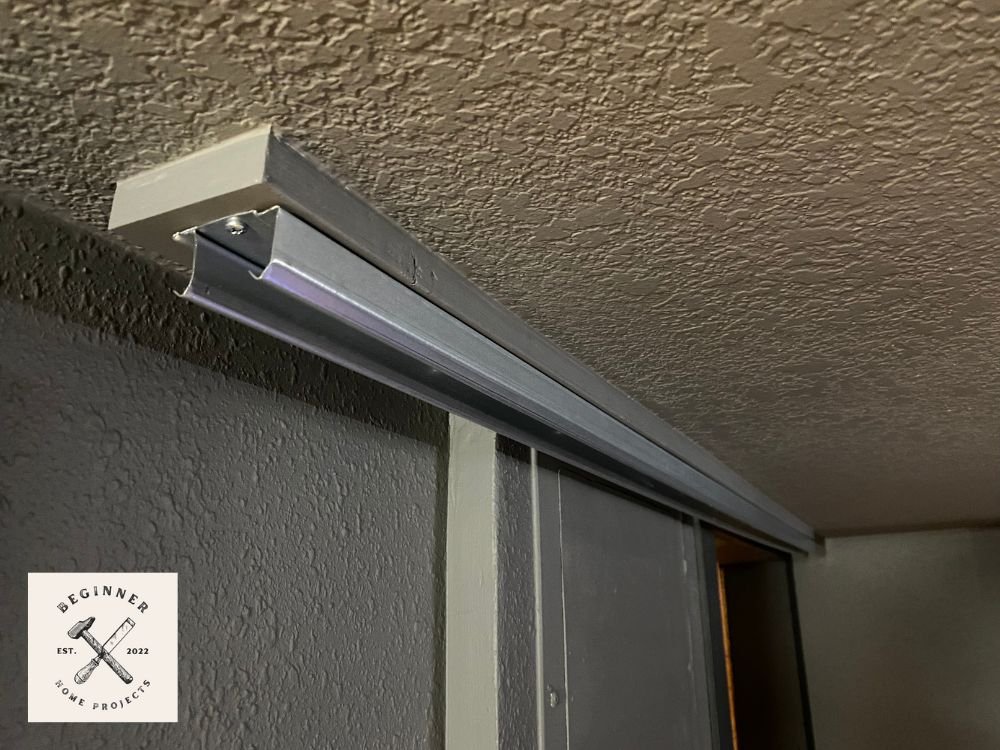
I wanted to span the ceiling joists with a 1x4 to give myself plenty of options for attaching the ceiling mount track. So, my first order of business was to cut a 1x4 to length. I gave it a couple of coats of paint, let it dry, then attached it to the ceiling joists (which I marked earlier using a stud finder) using 3-inch wood screws. As I was attaching the 1x4 to the ceiling, I noticed the ceiling had a slight bow. I decided it wasn’t enough of a problem to warrant shimming and trimming out the 1x4, so I attached the board to the ceiling with liquid nails and screws, letting the board conform to the slight bow in the ceiling.
The next step in the DIY ceiling mounted barn door process was to install the ceiling mount bypass track. I centered it on the 1x4, then attached it with the included screws.
The ceiling mount bypass door kit I bought included two types of anchors for the top of the door - a flush mount and an inset option. I used the flush-mount option and attached each with the provided screws to the top of the back of the door. I waited a few hours before hanging the door to give the liquid nails I used to secure the 1x4 for the track time to cure.
Note: I don’t like the look of the ceiling mount bypass door kit, but it was a far cheaper option than the overhead barn door kits I could find. Part of that is the stainless steel finish, which sticks out like a sore thumb in a room that’s painted dark gray and black. I’ll remove it at a later date and give it a quick coat of matte black spray paint so it matches the door hardware.
Step 5: Hang the Door, Install the Floor Guide, and Add a Door Handle
After a few hours, I returned to the den to hang the door. Usually, you tilt the bottom of the door towards you to seat the bottom of the wheels in the track. However, I had room to the left of the door track to slide the door in from that side. Initially, I put the door in the outermost track because I thought I would need the extra space to account for the chair rail on the wall behind the door when it’s open. However, once I got the door in place, I realized I could hang it on the innermost track and still have room for the door to move unimpeded.
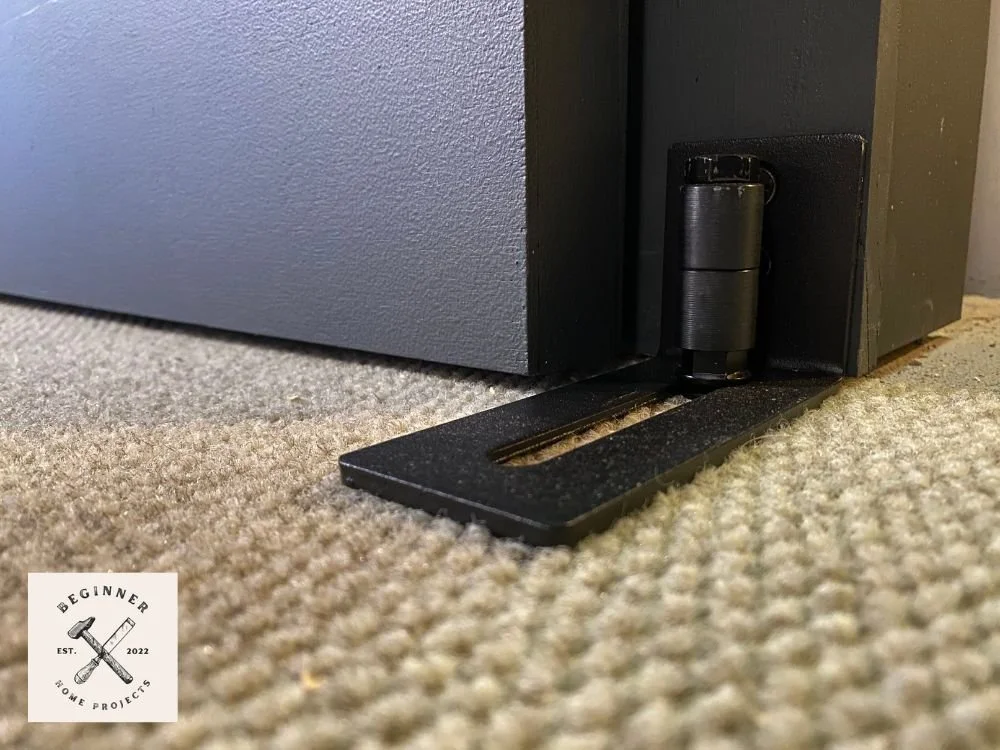
I added a floor guide kit to ensure the DIY ceiling mount barn door moves smoothly. Since the floor is concrete, I went with a wall-mounted guide, not realizing that doing so would mean the guide wasn’t deep enough for the door to slide between the two rollers. So instead, I removed the larger outer roller and used only the smaller inside roller, so the door simply glides across it. This means there’s nothing in front of the door to keep it aligned, but it works as long as I’m careful not to pull the door hard inward as I slide it open. It’s not ideal, but it was the best solution I could come up with on the fly.
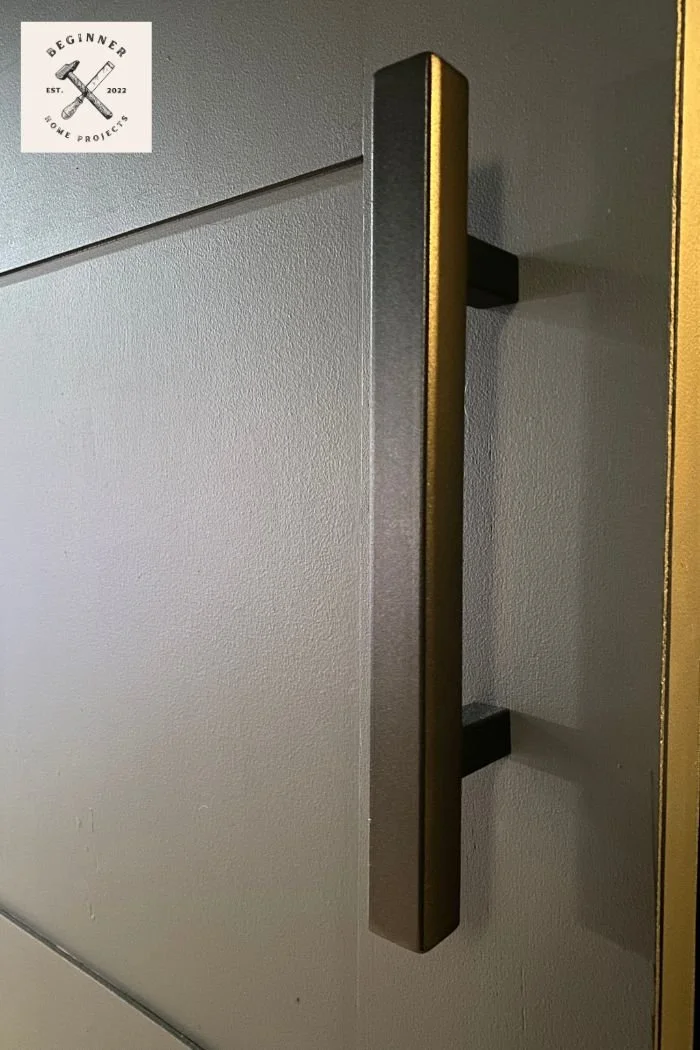
The final component was to add an oversized matte black handle. Installation was simple - just measure the distance between the handle’s mounting points, drill corresponding holes, and attach the handle and backplate. Voila - the door is done!
Additional DIY Ceiling Mounted Barn Door Tips
Here are a few more tips to consider when building your own barn door:
Measure the distance from the ceiling to the floor in several locations, including where the door will slide open. The floor in my den is nowhere near level, and the high point is near the leftmost portion where the door is open. If I hadn’t thought to measure there, the door would’ve been too long and wouldn’t open all the way.
Play around with the design of the door. Linear rails and stiles and a recessed panel look like this might not fit your vibe. You can cut strips of plywood for a horizontal shiplap look or a vertical shiplap look. Alternatively, you can come up with a more intricate geometric design or do something that mimics a slat wall. These are just a few options!
You don’t have to paint the door. Maple, birch, and other types of sanded plywood actually look really great when they’re stained.
This design works for many settings. I built this door for my tiny den, but you can build a barn for door hallway applications, a study, a home office, or other locations where a swinging door just isn’t practical.
Can you install a barn door without a header? I’m glad you asked! You need something substantial to carry the load of the door whether you install a traditional wall-mounted barn door or a DIY ceiling mounted barn door like mine. Whether that’s by using a header or adding studs in the wall or ceiling to directly mount the door track is up to you. In my case, I had no desire to open the drywall and add anchor points in the ceiling, so I opted for a header.
Can you build a DIY ceiling mounted barn door from scratch? You bet! I needed an identical door to the one featured in this post, so I built it from scratch using a 2x4 frame structure and an overlay of plywood, as described in this post.
Frequently Asked Questions
-
Most residential ceiling mount kits support 150 to 250 pounds. Always confirm the rating of your hardware and anchor it directly into ceiling joists or a solid header board for safe load support.
-
Yes. You need a solid mounting surface that spreads the load across multiple joists. A painted 1x4 or 2x6 board secured to joists works well as a header for attaching the track.
-
Hollow-core slab doors are popular because they are light, affordable, and easy to customize with plywood rails and stiles. Solid-core doors can work but may require heavier duty hardware.
-
You typically need 1 to 2 inches of clearance between the top of the door and the ceiling track, plus floor clearance of about half an inch to one inch to prevent dragging.
-
Yes. This is a beginner-friendly project if you have basic tools such as a drill, saw, level, and sander. Careful measuring and secure mounting are the most important steps.
-
Most DIYers complete the build and installation in a weekend. Painting and drying time can extend the timeline.
-
Costs vary based on materials, but many projects fall between $150 and $300 when using a slab door and budget-friendly hardware.